
NSX & Cumulus #1 - Setting up NSX
In these series we're going to set up NSX 6.3.2 on vSphere 6.5 in combination with a clos fabric based on Cumulus VX switches including hardware VTEP integration. Me and my friend and collegae Wouter van der Vaart will guide you through setting up the different parts needed to get everything up and running including problems we've encountered, but also tips & tricks.
This doesn't include a write-up of both products, but what these products do you can find here for NSX end here for Cumulus VX. But they coexist and integrate nicely especially in an automated SDDC (Software-Defined DataCenter).
First thing we're gonna do today is setup NSX and test basic VXLAN functionality over L3.
To set this lab up in GNS3 we need a few things:
- Freesco Router (for dns, ntp and internet)
- Management switch (gns3 builtin)
- VXLAN Router (Cisco 3640) (not really a vxlan router, but creates an L3 hop between the ESXi hosts)
- VMware vCenter Server Appliance 6.5.0d
- Two VMware ESXi 6.5.0d hosts
- NSX Manager 6.3.2
- NSX Controller 6.3.2 (3 for HA, but 1 works just fine in the lab)
- Two test vm's (we chose alpine linux for this occasion) running on esx1 & esx2
We've already installed the NSX Manager, connected it to the vCenter and deployed a single NSX Controller.
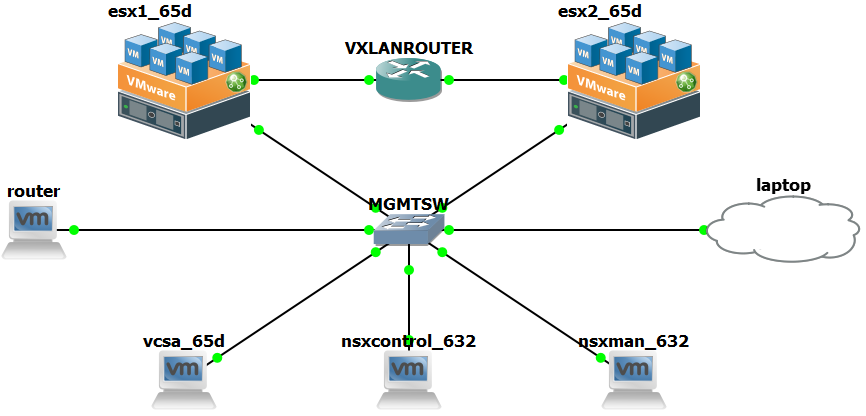
Lab IP Address plan
| MGMT Network | |||
|---|---|---|---|
| Default gateway | 10.10.100.1 | ||
| DNS | 10.10.100.1 | ||
| Domain | cumuluslab | ||
| router | 10.10.100.1/24 | ||
| vsca | 10.10.100.20/24 | ||
| esx1 | 10.10.100.21/24 | ||
| esx2 | 10.10.100.22/24 | ||
| nsxcont | 10.10.100.23/24 | ||
| nsxman | 10.10.100.24/24 | ||
| laptop | 10.10.100.30/24 | ||
| VXLAN Network | |||
| esx1 vxlan vmk1 | 10.10.101.1/30 | MTU | 1500 |
| esx1 vxlanrouter eth0/1 | 10.10.101.2/30 | MTU | 1500 |
| esx2 vxlan vmk1 | 10.10.101.9/30 | MTU | 1500 |
| esx2 vxlanrouter eth0/2 | 10.10.101.10/30 | MTU | 1500 |
| VXLAN Client Network | |||
| alpine01 | 10.10.200.11/24 | MTU | 1400 |
| alpine02 | 10.10.200.12/24 | MTU | 1400 |
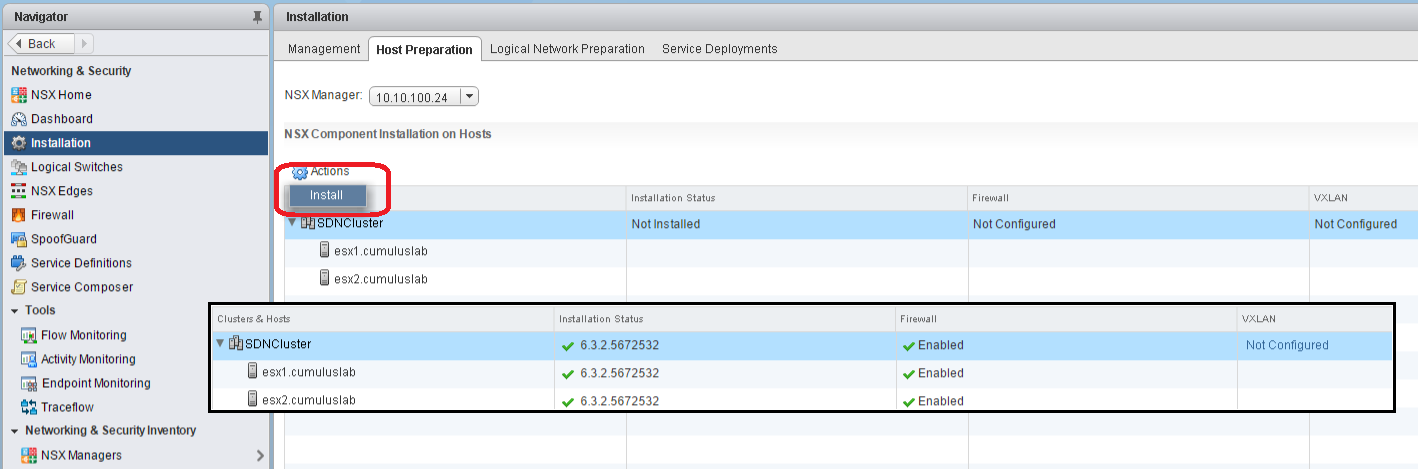
1. Install NSX to ESXi hosts
The first step is to install NSX to the ESXi hosts, just click Install from the Action menu on the Host Preparation tab. This could take a few minutes, depending on your environment.
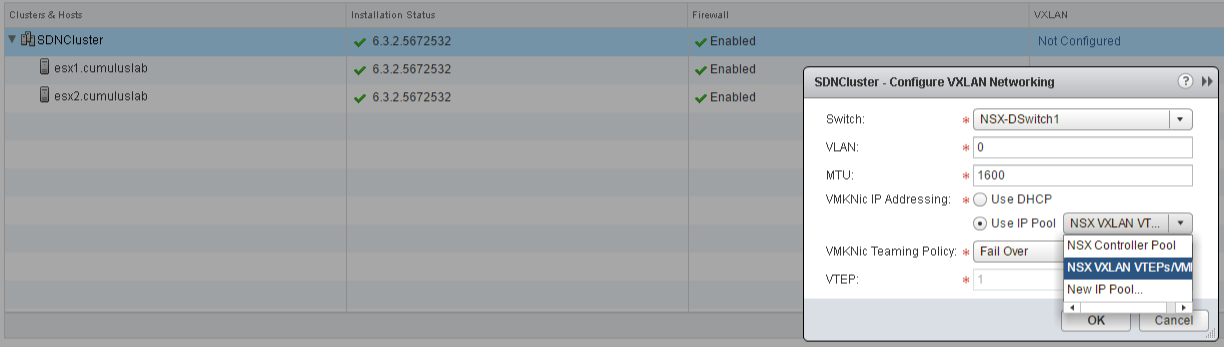
2. Configure VXLAN
The second step is to configure VXLAN and add a single VTEP VMKernel interface to each ESXi host. Click the "Not Configured" link on the Host Preparation tab and a popup will show.
In our case we're leaving the defaults, it already selected the correct Distributed Switch, "VLAN" zero and the Fail Over "VMKNic Teaming Policy".
The "MTU" is set to 1600, that's because the VXLAN encapsulation overhead, it will add 50 bytes to each packet:
Ethernet/MAC (14 byte) + IP (20 byte) + UDP (8 byte) + VXLAN (8 byte) + Original ethernet frame
In our lab environment though we are limited to 1500, therefore we will later on change the vmkernel ports to 1500 and the clients to 1400 to get everything up and running.
For "VMKNic IP Addressing" we're setting it to "Use IP Pool", because we haven't setup DHCP, but in our lab we're setting the VMKNics manually to get them in separate L2 domains, we'll show you how in the next few steps.
3. Logical network preparation
Goto Networking & Security > Installation > Logical Network Preparation
A. VXLAN is now configured on the cluster, check if all the settings are correct and all the check marks are green.
![]()
B. Next is to set the Segment ID range of VXLAN Segments, each VXLAN tunnel will have it's own segment ID. Don't create more than 10.000 ID's though, this is because vCenter limits you to 10.000 distributed port groups (recommended maximum). We created a thousand from 5000-5999.

C. Last thing we need to do is configure a Transport Zone, the VXLAN control plane handles the frame forwarding decision (which VTEP to send it to by VTEP discovery and MAC address lookup), there are three modes: multicast, unicast and hybrid, all three modes have their cons & pros. But because multicast and hybrid require special configuration on the physical networking layer (IGMP), we chose unicast in our LAB setup.
For a in-depth explanation of the three modes check the articles here and here.
![]()
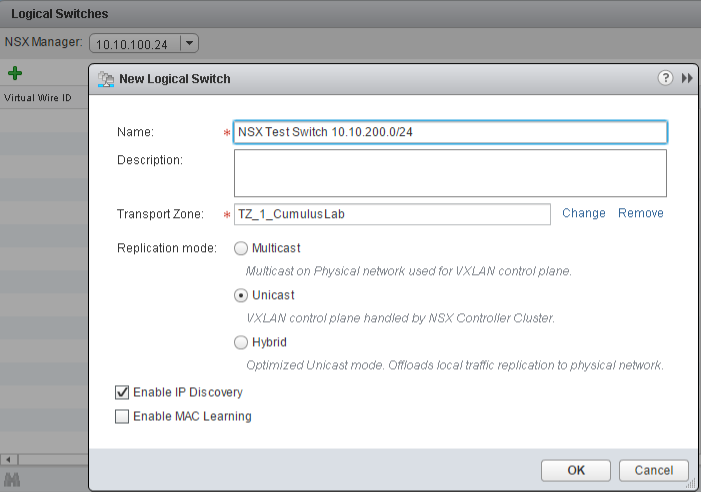
4. Create a logical switch and add the VM's
Next up is creating a NSX logical switch, each logical switch gets it's own Segment ID and will create a virtual wire dvPortgroup.
A. Goto Networking & Security > Logical Switches and click + to add a new logical switch. We will call our switch "NSX Test Switch 10.10.200.0/24", add it to our previously created Transport Zone, select unicast and IP Discovery and press OK.
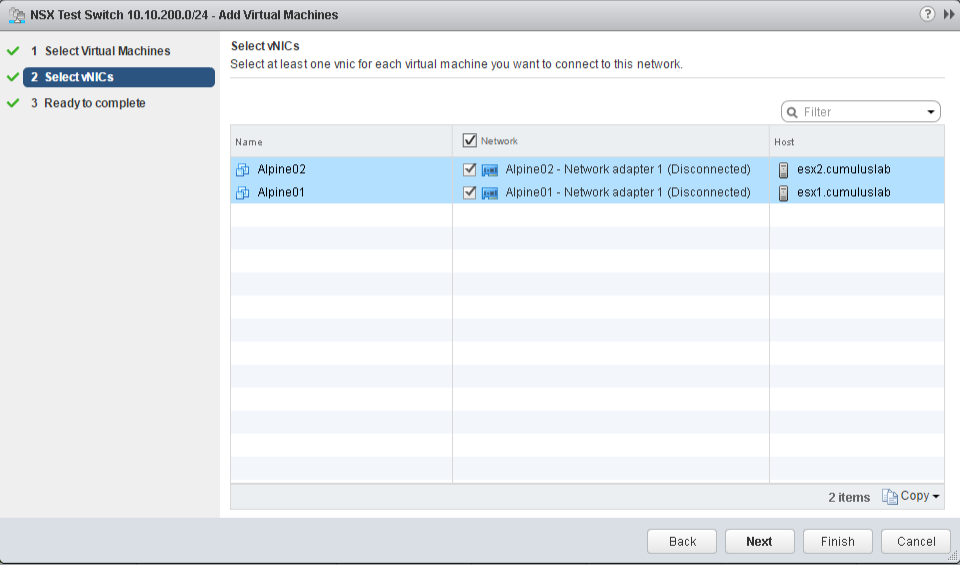
B. Add the two test VM's Alpine01 and Alpine02 to the newly created "NSX Test Switch 10.10.200.0/24".
Select the logical switch "NSX Test Switch 10.10.200.0/24" and click Add VM from the Actions menu.
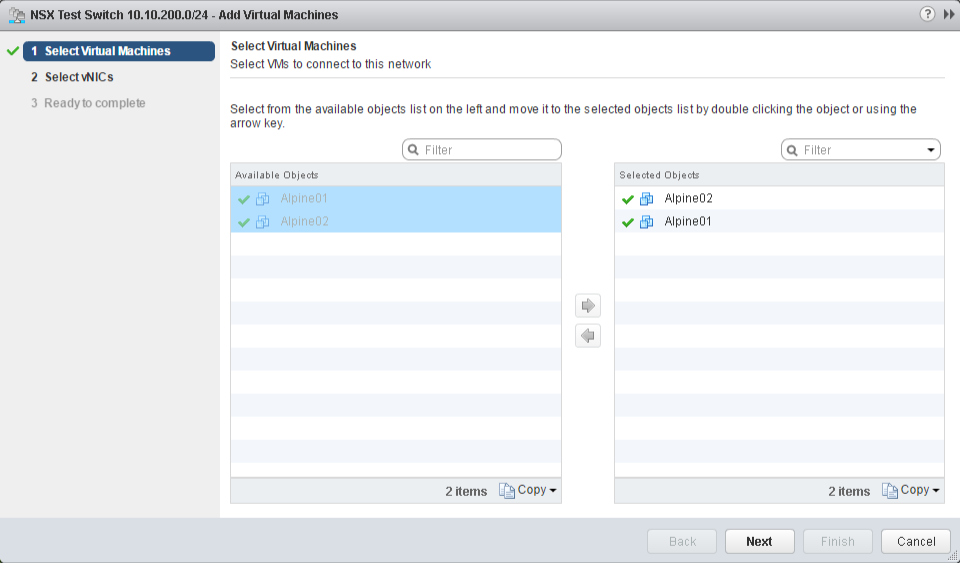
Select which adapters to add to the logical switch.
5. IP Pool Multiple subnets + MTU fix
In our LAB setup using VMware Workstation and GNS3 we weren't able to set an higher MTU and because of that limitation we lowered the NSX VTEP interface MTU to 1500 (1600 is the default) and the MTU of our Alpine test VM's down to 1400.
We also wanted to build the LAB with both NSX VTEP's in different broadcast domains with a router in between, which we also needed for our integration with de Cumulus VX switches in the next article. But NSX doesn't allow you to configure this using the GUI, the only options through the NSX GUI are IP Pool and DHCP, the IP Pool option doesn't allow for multiple subnets per cluster and we didn't have a DHCP server setup in our LAB, so we configured it manually.
Check the ESXCLI below for setting both the VTEP IP addresses on the VMKernel interfaces and lowering the MTU.
ESX1
esxcli network ip interface ipv4 set -i vmk1 -t static -I 10.10.101.1 -N 255.255.255.252
esxcli network ip interface ipv4 get -i vmk1

esxcli network ip route ipv4 remove -g 10.10.101.254 -n default -N vxlan
esxcli network ip route ipv4 add -g 10.10.101.2 -n default -N vxlan
esxcli network ip route ipv4 list -N vxlan

esxcli network ip interface set -i vmk1 -m 1500
esxcli network ip interface list -N vxlan
ESX2
esxcli network ip interface ipv4 set -i vmk1 -t static -I 10.10.101.9 -N 255.255.255.252
esxcli network ip interface ipv4 get -i vmk1

esxcli network ip route ipv4 remove -g 10.10.101.254 -n default -N vxlan
esxcli network ip route ipv4 add -g 10.10.101.10 -n default -N vxlan
esxcli network ip route ipv4 list -N vxlan

esxcli network ip interface set -i vmk1 -m 1500
esxcli network ip interface list -N vxlan
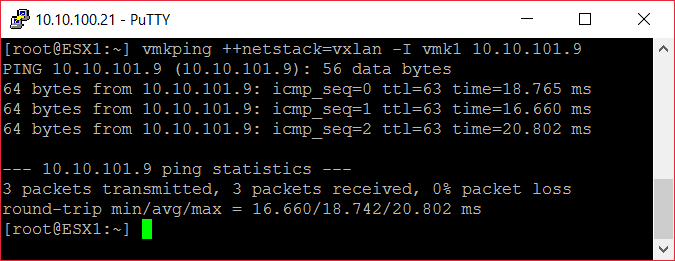
6. Test: Connectivity between the both ESXi hosts
Ping test using the VTEP VMKernel ports.
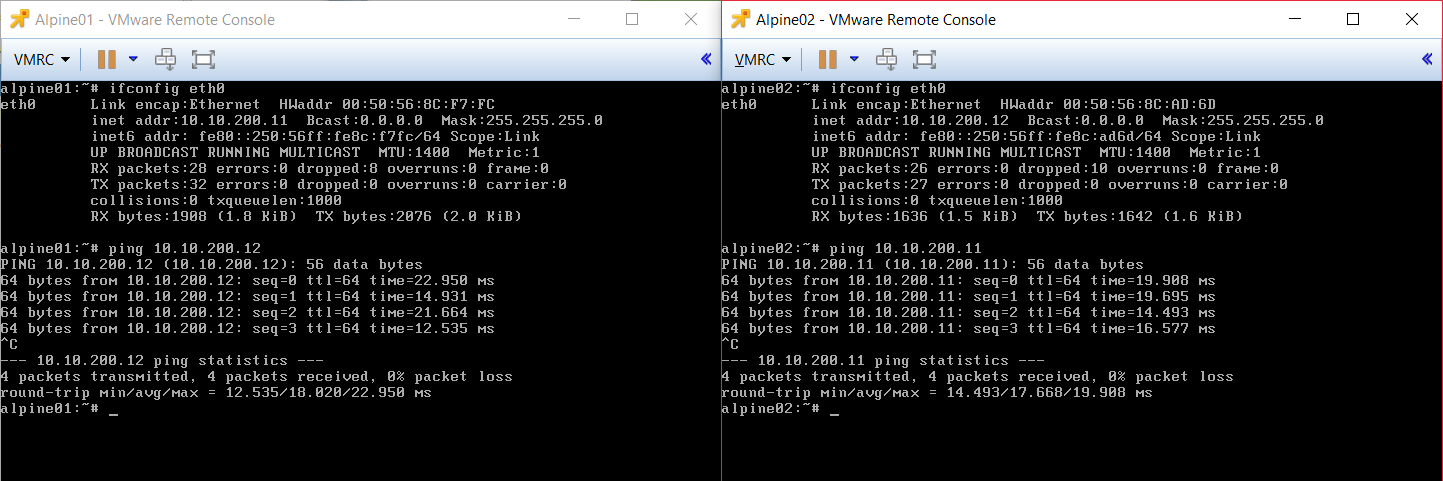
7. Final test: VM connectivity over the virtual wire
The hard work has paid off, the ping test from test VM Alpine01 to VM Alpine02 worked as expected!
Next up building the Cumulus VX CLOS Fabric + VTEP Integration!
Articles in these series
/nsx-cumulus-part1-en/
/nsx-cumulus-part2-en/
/nsx-cumulus-part3-en/
SHARE THIS POST